Introduction
First, there was Web 1.0 – read-only internet, they called it. Today, we have Web 2.0 – read and write. And some say we are already at the cusp of Web 3.0 or Web3 – read, write, and own!
Web3 is already here, and you must have your own Web3 wallet. It is a fundamental tool for anyone looking to navigate the decentralized frontier. A Web3 wallet is a software program that stores private keys to access blockchain networks and conduct transactions. The wallet in your back pocket stores cash; the Web3 wallet stores digital assets like NFTs and cryptocurrencies.
Thus, the Web3 wallet, also known as a crypto wallet, serves as your secure vault for digital assets, be it cryptocurrencies, non-fungible tokens (NFTs), in-game assets in Web3 gaming, or other blockchain-based valuables. But it’s more than just a digital piggy bank; it’s your key to unlocking the full potential of the Web3 ecosystem, allowing you to seamlessly interact with decentralized applications (dApps) and blockchain networks. Additionally, Web3 wallets are interoperable, enabling the management of different digital assets across multiple blockchain networks.
Understanding the Web3 Wallet Landscape
Before we delve into the nitty-gritty of creating your own Web3 wallet, let’s take a moment to grasp the significance of this technology. Web3 wallets are purpose-built to bridge the gap between users and the decentralized world. They empower you with control over your assets and funds, enabling you to engage with decentralized finance (DeFi) platforms, decentralized exchanges, and various other services, all while maintaining the utmost security and integrity of your transactions and assets.
The landscape of Web3 wallets is diverse and expanding. Leading providers offer a range of solutions, from browser extensions to mobile apps and even hardware devices. Familiar names like MetaMask, Trust Wallet, Coinbase Wallet, and MyEtherWallet (MEW) are making strides in simplifying the user experience, paving the way for the broader adoption of Web3 technology.
However, while the potential of Web3 is immense, its adoption and comprehension are still evolving. Education and accessibility are keys to realizing the full extent of what Web3 has to offer. As the Web3 landscape continues to mature, its fusion of blockchain technology, decentralized applications, cryptocurrencies, and NFTs holds the promise of reshaping the digital landscape.
Why Your Web3 Wallet Matters
At the core of the Web3 revolution is the concept of a new, decentralized internet. Web3 leverages blockchain technology. It translates to an era of transparency, user empowerment, and open collaboration. This evolution introduces concepts like smart contracts and dApps, shifting control from centralized entities to a distributed network of participants.
A Web3 wallet plays a pivotal role in this transformation. It serves as your digital conduit to the Web3 universe, enabling you to securely store, manage, and interact with your digital assets. It provides a haven for your cryptocurrencies and NFTs and facilitates engagement with dApps that span from decentralized finance to digital identity and beyond.
Creating Your Web3 Wallet: Step by Step
Now that you grasp the significance of a Web3 wallet, let’s embark on the journey of creating one. For now, let’s do this for the desktop version:
- Download and Install Polkadot.js Extension:
Visit the official Polkadot.js website https://polkadot.js.org/extension/ Download and install the Polkadot.js extension for your preferred browser (Chrome or Firefox). In our example below, we download for chrome - Open Polkadot.js Extension:
Click on the Polkadot.js extension icon in your browser’s toolbar to open the extension. - Create a New Account:
Upon opening the extension, you’ll see an interface where you can manage your accounts.
Click on the “Create new account” button to create a new account. - Set Up Your Account:
Choose a strong password for your account. This password will be required to unlock your account for transactions, so make sure to remember it.
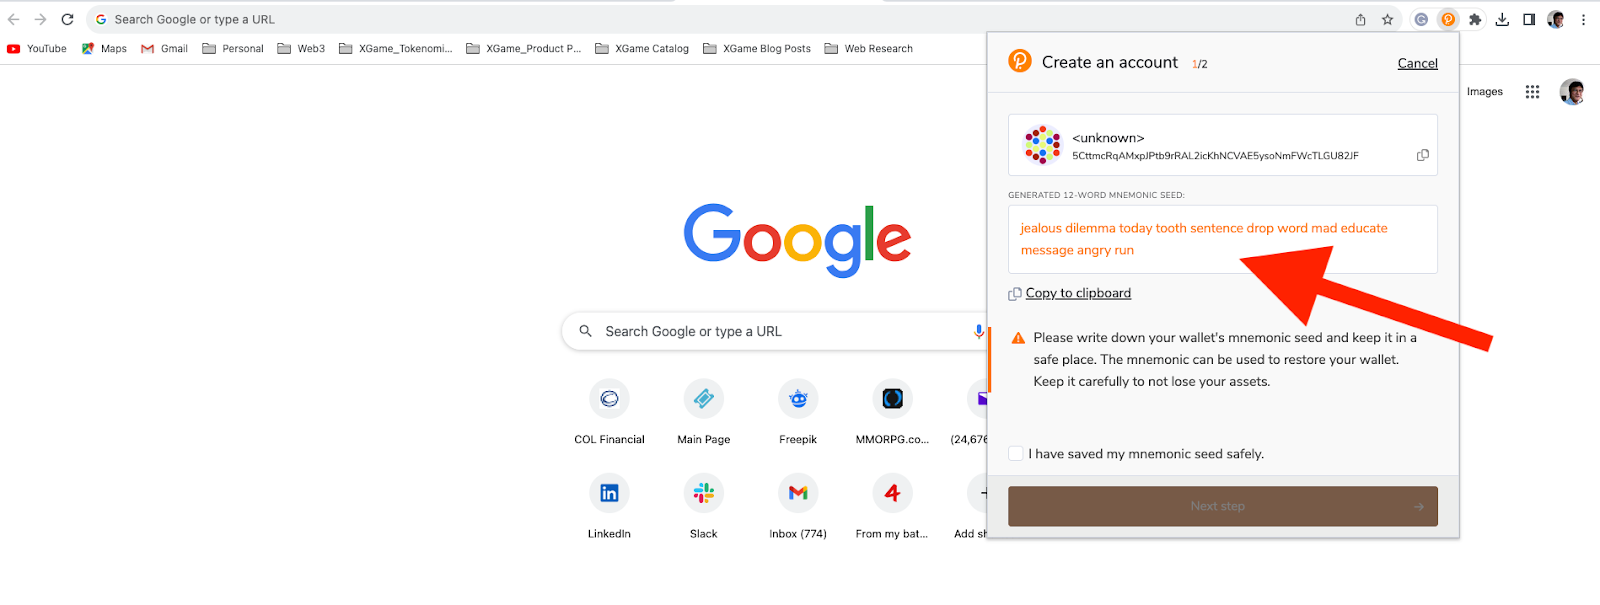
Confirm the password. - Backup Your Seed Phrase:
The extension will provide you with a 12 or 24-word seed phrase. This is a crucial backup that can be used to recover your account if you forget your password or lose access to your device.
Write down the seed phrase and store it in a secure place offline. Do not share this phrase with anyone. - Confirm Seed Phrase:
The extension will ask you to confirm some of the words from your seed phrase to ensure you’ve backed it up correctly - Account Creation Complete:
Once you’ve confirmed your seed phrase, your account will be successfully created.
You’ll see your account listed in the Polkadot.js extension interface along with its address. - Accessing Your Account:
Whenever you want to access your account or perform transactions, open the Polkadot.js extension and enter your account password to unlock it. - Once again, Backup Your Seed Phrase:
This step is crucial. Your wallet will generate a seed phrase sequence of 12 to 24 words that acts as a failsafe. Write down this phrase and store it in a safe place offline. It’s your lifeline in case you ever lose access to your wallet.

Enter the Web3 Universe: With your wallet created and seed phrase safely stored, you’re ready to explore the Web3 world. Use your wallet to send and receive cryptocurrencies, connect with dApps, and harness the power of decentralized finance.
Bridging Web3 with Your Business
The potential of Web3 extends beyond personal use. Developers can seamlessly integrate Web3 wallet functionality into their applications, empowering them to accept crypto payments and transactions. This integration enhances user experience by incorporating convenient social logins and cloud recovery mechanisms, adding a layer of convenience and security to the user journey.
As the Web3 landscape continues to evolve, the fusion of technology and decentralized principles will redefine the digital landscape. With your Web3 wallet as your compass, you navigate this exciting new frontier where ownership, control, transparency, and empowerment converge.
In conclusion, the journey into the Web3 era begins with creating your own Web3 wallet. It’s not merely a digital storage solution. It’s a bridge connecting you to the decentralized future. The more you understand the principles and potential of Web3, the better equipped you are to harness its full power. So, choose your wallet provider, download the Web3 wallet app, secure your seed phrase, and step boldly into the world of Web3. The future of the internet awaits – and your Web3 wallet is your key to unlocking its limitless possibilities. Visit https://dashboard.xgame.live/wallet.